If you’re a hanging athlete you probably spend more time than most thinking about your shoulders. How do they work? How do I make them work better? And, unfortunately, why do they hurt?
Shoulder pain and injury is a real problem for aerialists and pole dancers. And it doesn’t discriminate- I see everyone from beginners to pros complaining about shoulder pain or discomfort. The reasons why can vary: for a beginner, they may be trying to do more than their body is ready for. A more advanced artist may be struggling with a muscular imbalance or a previous injury that never fully healed. Either way, having a shoulder maintenance routine that you do regularly, either as part of a warm up or on it’s own, is an important part of keeping your shoulders healthy and strong so you can enjoy pain-free movement in the air.
But what goes into a good routine, you ask?
I’m going to tell you all about it!
But first, the obligatory disclaimer: If you are having regular pain, shooting pain, stabbing pain, pain in specific ranges of motion that doesn’t go away, pain that is limiting your range of motion, pain or discomfort that has lasted more than a week or two, pain or discomfort that is getting worse, STOP READING THIS AND GO SEE A DOCTOR. Seriously. You are already injured, please go get treatment from a medical professional.
Now that that’s out of the way, let’s talk about how to avoid getting those injuries!
A good maintenance routine will have a specific order of operations, and there are important reasons why. To understand this better, let’s talk about some anatomy.
We’re going to focus on the scapula (shoulder blade) and humerus (upper arm bone). These two bones make up most of the shoulder joint. Let’s start with the scapula.
The scapula move in a bunch of ways: they elevate or slide up, depress or slide down. They protract which is sliding towards the front of your body, and retract which is sliding towards your spine. When you combine these motions, the scapula upwardly rotates and downwardly rotates.
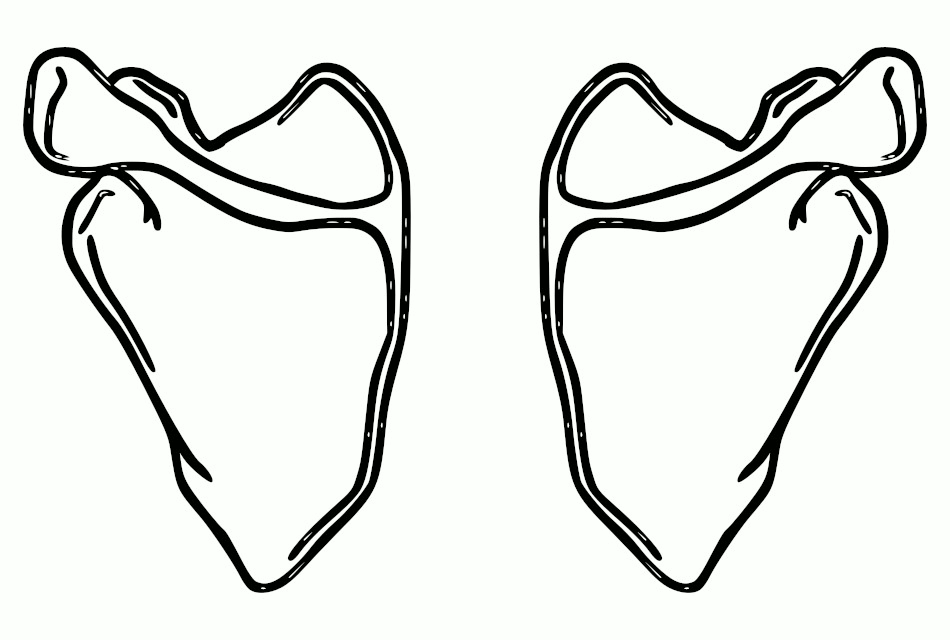
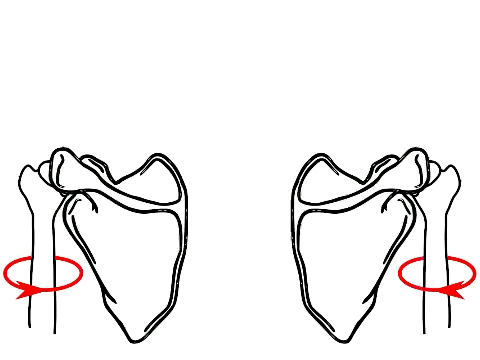
This upward rotation is what’s super important for us overhead athletes. When you lift your arm overhead, the upward rotation is what keeps the humerus fully connected to the socket on the scapula. Additionally, when you’re lifting your arm overhead, the humerus should be externally rotating (which means its turning in the socket). The external rotation is also helping to keep it fully connected to the socket.
There are a bunch of muscles that attach your scapula to your ribs, and those muscles control these movements. There are also muscles that connect your humerus to your scapula, the mythic rotator cuff muscles. We start running into problems when these muscles aren’t strong enough to do the work that we’re asking of them. That work is being able to resist gravity to keep your bones in the right place so that the rest of your muscles can work effectively!
(This is clearly the super duper condensed anatomy talk. If you’re interested in learning about this stuff in more depth, I highly recommend reading Applied Anatomy of Aerial Arts by Emily Scherb. She’s smart, the book is brilliant, and you’ll learn a ton about how your skin suit works!)
Okay, anatomy stuff out of the way. Let’s talk about what this means for your shoulder maintenance routine!
The goal of your shoulder routine should be to create stability.
Stability is the strength you have to resist force, either external force or force created by your own body. For your shoulders, that means strengthening the muscles that hold your scapula to your ribs so they don’t get jerked around while you’re doing weird stuff while hanging from your arms. When your scapula are stable the muscles of your rotator cuff can do a better job of keeping your humerus in the socket, and then all of the rest of the muscles around your shoulder can work more effectively and you can do badass shit more easily and without pain.
So, with all that in mind, your shoulder maintenance routine is going to begin with working on the muscles that control the scapula.
Serratus slides:
These can be done with your arms on a wall or without, the motion remains the same. Pressing your arms into the wall can provide helpful feedback, but I’m demonstrating without the wall for the sake of visual clarity.
Use a light band for this, and it can go around your elbows, wrists, or you can hold it in your hands. It’s easiest with the band around your elbows, and harder with it in your hands. It’s way more important that you do this movement in a way that you can feel and control well, as opposed to trying to work as hard as you can.
Keep your arms shoulder width apart, and your palms facing in. Make sure your core is on, and your ribs aren’t lifting as you move.
To begin, thinking about pressing your elbows forward. You’re trying to turn on muscles in your armpit and on the sides of your ribs and you should feel them starting to work. Keep reaching your elbows forward as your arms slide up, you should feel like your armpits are pressing your arms up rather than your neck or tops of the shoulders pulling them up. Go up as high as you can without letting your hands come closer together or your neck/ upper traps start clenching. Your elbows might straighten or they might not! If you’re struggling to keep it out of your neck, you can try widening your hands as they lift. When you’re sliding your arms back down, begin by reaching your elbows forward again.
In this movement, we want to feel the upward and downward rotation of the shoulder blades, and the feeling of work should stay in the armpit and sides of the ribs for the most part.
Things to watch out for: neck tension, elbows turning out and hands coming together, and ribs lifting up.
Diamond arms or Ys:
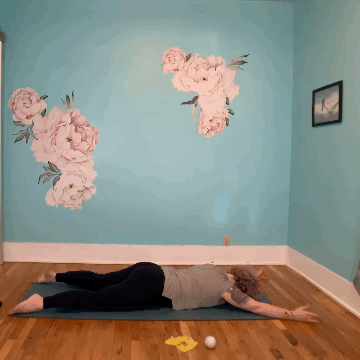
This exercise is targeting your low trapezius mainly. Lay on your stomach with your elbows bent to 90’ and slightly higher than your shoulders. Your fingers are pointing to the tip of the diamond over your head and your thumbs are pointing to the ceiling.
Start sliding your shoulder blades down your back gently. Think about them reaching for your back pockets rather than trying to pull them together. As they start to slide, lift your hands to the ceiling but keep your elbows on the ground. You should feel your upper arm turning in, like your armpit is turning towards your cheek. You should feel the work between your shoulder blades and at the bottom of your shoulder blades, and maybe in your armpit. If you feel it in your neck, make sure your shoulder blades are sliding down and your upper arm is turning.
If it feels good in this position, you can make it harder by sliding your hands up till your fingertips meet at the top of the diamond. The movement remains the same, but it will be harder to keep it out of the neck.
The hardest way to do this is by straightening your elbows so that your arms make a Y. You’ll keep the sliding action in your shoulder blades, and pull your arms off the ground reaching thumbs to ceiling. SUPER HARD!!
Find a position with your arms where you can feel connected to the movement and keep the tension out of your neck and upper shoulders and work there!
Things to watch out for: neck tension!! It’s REALLY important to not let your upper traps get involved here. Also, make sure you’re not jamming your shoulder blades all the way down before moving your arms. It’s a gentle movement, and you should feel like lifting your arms does most of it.
Now that your scapula are warmed up, it’s time for…
External rotation:
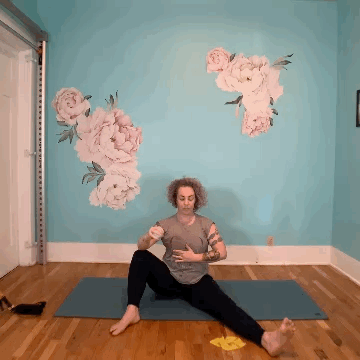
You can train this a bunch of different ways, but this is an easy way to set it up. You can hold a weight (keep it light, no more than 3lbs), a water bottle, or squeeze something like a tennis or lacrosse ball. Or just squeeze your fist! You want to create some tension in your muscles.
Sit on the floor with one knee up and slightly out to the side. Put your elbow on your knee, and bend it to 90’. Slide your shoulder blade back a little- just a little, don’t jam it all the way to your spine. While you’re doing the movement, pay attention to keeping it still. Now that we’re focusing on the humerus moving, it’s important that the scapula remain stable.
Lift your forearm, rotating on the elbow resting on the knee. Think about trying to press your hand back as far as you can without moving your shoulder blade. As your hand comes back to the starting position, don’t let your shoulder blade and shoulder roll forward. You’re trying to twist your upper arm in the socket without anything else moving.
You might feel fatigue in a really specific spot on the top of your arm bone, or on your shoulder blade. That’s good! If you’re feeling it in your neck, chest, or really anywhere else, try less weight and pay close attention to whether you’re keeping your shoulder blade stable. It’s pretty hard to let your ribs pop out in this position, but I’m sure some of you are capable of it, so keep your eyes on that too!
Things to watch out for: wiggly shoulder blades, wiggly ribs, neck tension.
Moving external rotation:
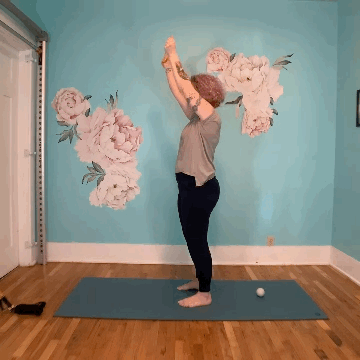
Now that external rotation is warmed up, let’s strengthen it in more functional ranges of motion!
Stand with a lighter band in your hands, and your arms by your sides and slightly in front of your hips- palms should be facing the legs. Set your ribs and your shoulder blades. Turn your palms to face out without moving the shoulder blades- you should feel your upper arm turn and come back towards the sides of your body, and you might feel like your chest got wider.
Once this position feels good, lift your arms up a few inches in front of you and do it again. Keep going till your arms are as high up as you can go without neck clenching or rib popping. If you’re not sure what your ribs are doing, you can stand with your back against a wall and think about keeping the bottom of your ribs on the wall. Bring your arms back to your sides, rotating in and out the whole way down.
Things to watch out for: Wiggly shoulder blades- while they should be upwardly rotating as we lift our arms higher, they should not be moving while we turn our arms in and out. They especially shouldn’t be sliding together or towards the spine. Wiggly ribs- the higher we lift our arms, the harder it is to keep the ribs down. Keeping your ribs in might be your limiting factor, and that’s okay. Just lift your arms as high as you can until your ribs won’t stay down and stop there. Neck clenching- if you can get your arms all the way up without your ribs, make sure that spot at the base of your neck isn’t clenching. Harder than it should be, I know!
Integration:
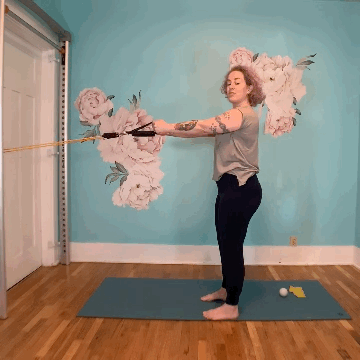
After you’ve isolated all of these pieces of shoulder movement, it’s really helpful to put them all together into a larger movement. It teaches your brain and body how all the little parts work together in a stronger whole. Integration is best done with lighter resistance- again, the focus is on connecting to how everything works together and being able to memorize that feeling in your body.
For this movement, use a lighter band and have it anchored around chest height. Stand up straight, and make sure you have weight on your heels. Connect your ribs and your core.
Draw your hands together by pulling your elbows wide. Keep your shoulder blades still as you do this, don’t initiate by retracting them. Think about reaching your elbows to either wall. Unfurl your arms like wings, continuing to reach wide through your elbows. When your arms are open, your fingers are trying to touch the walls. Keep your shoulder blades steady throughout, they may move a little at the very end of the movement and that’s okay. The point is to move your arm before the shoulder blade moves as opposed to moving your shoulder blade to initiate the movement of the arm. Make sure your ribs stay still throughout, we’re trying to learn how our arms move around our trunk without needing to move the trunk!
Things to watch out for: shoulder blades wiggling around, ribs moving.
Here’s a video you can follow along with and listen to all my verbal cuing. It includes all these exercises and a bonus integration exercise at the end!
These exercises aren’t the only way to do a maintenance routine, you can switch them out for exercises that are more effective for your body, or add in things that your body needs. But the elements that are important are: scapular stabilization- usually targeting serratus anterior and the low traps, external rotation, and integration. Building a routine around these concepts will help you enjoy strong and capable shoulders and injury-free training!
Want more simple and effective ways to keep your shoulders strong and reduce your risk of injury in pole and aerial at-home? Or unable to train in the studio, because your state is shutting down, but want to maintain your strength?
I’ve gotchu.
Enter your info below to hop on my list for free workouts to help you with aerial and more information about virtual private sessions and online classes for aerial conditioning at home.

Bookmarking this page to repeat ALL THE TIME!!!!! Thank you!!!!
LOL