Welcome back to another installment of Inversions 101. In this series I’m breaking down
- What happens when you invert
- What often goes wrong, including mistakes you probably don’t know you’re making + how to fix it
- My favorite drills and exercises I use to help people learn to invert, or refine a struggling inversion.
Today I’m going to talk about how to keep your butt over your head after you get it there, but before we do that let’s do a quick recap of the previous topics.
Step 1:
Get Small and Round. This step is all about flexing your hips and spine and making your body as compact as possible. Need a refresh? Check it out here.
Step 2:
Get your butt over your head. This step is focused on finding a strong lock-off position so you can efficiently tip yourself upside down. Catch up here!
Now, in real life, these 2 steps happen at nearly the same time because they’re happening really fast. You lift your legs quickly, which pulls you into your small and round shape, and the force of your legs lifting also helps you push yourself upside down. A little bit of omph from your legs can really go a long way, but the rest of your parts still need to know what to do!
Your butt is over your head, now what?
I often work with students who can get upside down but struggle to stay there, or just bypass the finished position by throwing their leg onto the apparatus and moving on to their next skill. But being able to hold your inversion is important for moving on to more complicated and challenging skills. Also, from a purely aesthetic point of view, it looks better if that’s a position you’re confident in instead of rushing through it.
But if you struggle, what’s holding you back?
In my experience, it’s almost always because you’re not stacked.
What’s stacked?
Stacked is when you’ve flattened out your back so your pelvis is stacked over your shoulders. In this position, we’re balanced which means we can stay there with less effort. And that means we have energy to start working on the next thing instead of using it all just to stay there.

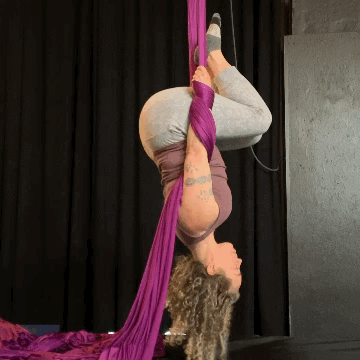
Stacked looks a little bit different in a tuck vs. a straddle.
In a tuck your arms are by your sides, which is a big advantage in finding your stack. With your upper arm in this position, you’re getting support from your lats (we talked about this in part 2!), and this is going to help your shoulder girdle become really stable. This stability is what allows you to balance your pelvis over your shoulders in a stack.
From your inverted position, you should try to lift your butt towards your hands, flatten your back, and open your chest. Your knees open out from your belly but are still bent and tucked in front of you, and your head is neutral.

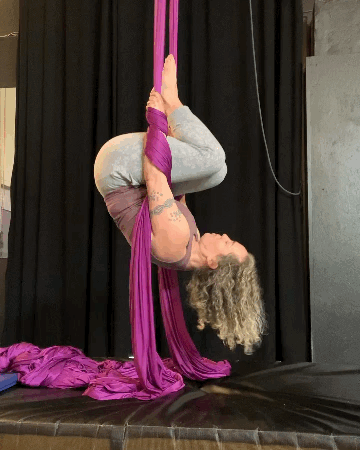
Finding your stack in a straddle is a bit trickier, because the position itself keeps you from fully stacking. With your arms in front of you, it’s harder to get your upper arm to your side and your hands keep your pelvis from fully balancing over your shoulders.
In an inverted straddle, I focus on two things:
- Rather than keeping your elbows straight, which keeps your upper arm in front of your chest, allow your elbows to soften and think of pulling your upper arm back. You can also think about reaching your chest out. If you’re working from a really solid lock-off, you should basically already be in this position when you get upside down!
- As you lift your butt up, press your inner thighs into your wrists and your wrists into your inner thighs. This active connection will help you to both open your chest and engage your lats, and help you keep your butt up.

When you find your stack, you’re coming all the way out of your small and round shape. Small and round is a great way to move from one position into another, but it’s not a great shape for balancing. But sometimes finding your stack can feel confusing, as we’re working against gravity in a weird way.
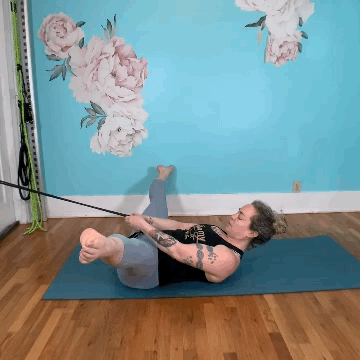
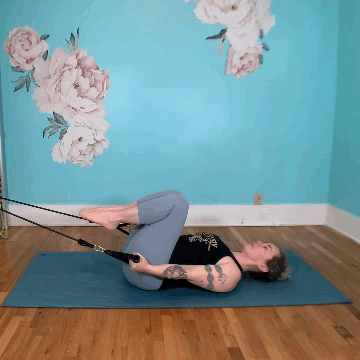
Find your stack on the floor:
Anchor a resistance band a few feet from the floor and lay on your back with your head away from the anchor point. Hold the band in either hand and curl up. Then lay back down pulling your arms to your sides. The resistance is taking the place of gravity, so pay attention to how engaged you can be when you’re flat on the floor with your arms by your sides, as opposed to curled up with your arms a little bit in front of you.

After you’ve tried the tuck a few times, open your legs into a straddle, and bring your hands together. Now, as you lay back down, try pulling your elbows towards the floor. Feel the front of your chest get more open and the support you get from your back when you get your upper arm closer to your side!
Find your stack in the air:
If you feel wobbly hanging from your arms, it can help to work on a solid apparatus like a trapeze. You can also do this holding split fabric!
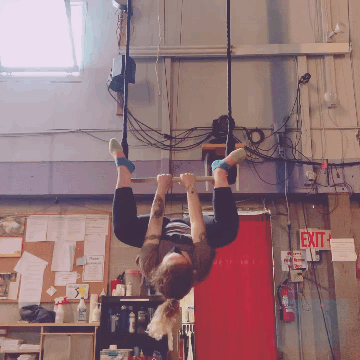
Tuck under the bar in your small and round shape (and if you need to use your feet, I won’t tell!) From here, try to touch your butt to the bar. If you’re doing this on the fabric, try to lift your butt to your hands. Pay attention to whether you’re lifting your legs to do it, or lifting your butt.

If you’re lifting your legs, your back will stay round and you’ll probably feel way less balanced. If you’re lifting your butt, your back will flatten out and your knees will stay in front of you.
Also, pay attention to where your head is! If you’re looking at the floor, I promise you will feel way less balanced! If you need to tell yourself where to look, look for your knees. Otherwise just let your head be neutral!

To find your stack in a straddle, use whatever apparatus you prefer. Again, if you often feel wobbly, a solid apparatus can help with that.
Get your butt up with your feet on the apparatus next to your hands (sometimes this is called The Spiderman). Keeping your feet on, pull your elbows to your sides and lift your hips towards your hands. When you feel solid, take off one foot and then the other.
If you need to work up to this, take one foot off and then switch with the other foot so that you always have one foot on the apparatus.
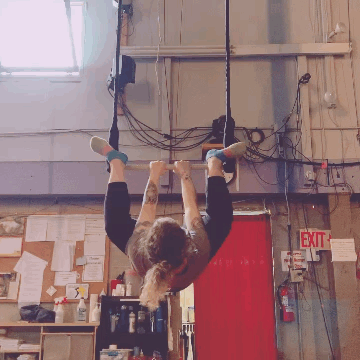
Same focus on the head for this shape! You might notice then when you go to flatten your back, you want to throw your head back! And that’s not helping anything!
Once you’ve found your stack, work on coming down slow! This will help you work on the strength you need to do this skill.
To come down slow, you’ll go back to your small and round shape and try to lift your shoulders to your hands as you come upright. Your butt should come down before your legs do, and your feet should come to the floor lightly.
Ideally you’ll come out into your lock-off, but if you struggle with that work on slowing down your descent as much as possible. If you’re shooting your legs out and landing loudly on the ground, this slow descent is going to help you a lot!
Try this drill on the ground to help you return to your lock off in the air! After practicing your stack on the floor, curl up and pull your hands to you shoulders keeping your upper arm by your sides.
Hope this helped! If you want to catch my next blog post, make sure to sign up for my mailing list!
