Hey, welcome back to Inversions 101! I’m breaking down basic inversions and talking about:
- What happens when you invert
- What often goes wrong, including mistakes you probably don’t know you’re making + how to fix it
- My favorite drills and exercises I use to help people learn to invert, or refine a struggling inversion.
(Did you miss part 1? Catch up here!)
Today we’re going to talk about how to get your butt over your head, the actual act of going upside down.
I like to teach a basic invert from a bent arm hang, or lock off. What I’m looking for in a bent arm hang is a position where your upper arms are all the way by your sides, the elbows bent, and the hands are about shoulder height. This is basically the same if your hands are separate or together. Your upper back should be pretty straight, and you’re not rounding forward and snuggling your arms. There should be space between your shoulders and ears.
In this position, we can get the most support from our latissimus dorsi, or lats. Your lats are a big muscle that starts near your low back and goes all the way up to the head of your humerus, or the top of your upper arm. It pulls your upper arm down, like if you’re doing a pull up, it’s pulling your upper arm to your side to lift you up.
In the lock off, your lats are holding your upper arm into your side with the assistance of your pectoralis major, your chest.
When you do your lock off in a snuggled position with a rounded back, it makes it A LOT harder for your lats to help support you, and then your chest doing all the work. Your chest is way less effective at keeping your arms by your sides when you’re inverting, and that’s going to be important later.
Find your lats!
Lat Pull Down
- Attach a resistance band to something higher than your head and stand with it by your side. Reach up and grab it with your arm as straight as you can get it.
- Pull your elbow down and into your side and pause at the bottom. Notice if your shoulder is by your ear, or if your elbow is pointing in some weird direction.
- Then, gently resist as your arm straightens back up.

It can help to think about reaching away with your elbow as you’re pulling your arm down, but if that doesn’t make sense then don’t worry about it! You might also try reaching your elbow to the floor when it’s by your side and see if that feels any different.
Do both sides (duh.)
Fabric Pull Down
- Now, grab a fabric. Or a sling, but something that has a little bit of stretch to it.
- Hold it with your hand on either strand, and with hands a bit higher than shoulder height.
- Pull your elbows down towards your waist, allowing the fabric to stretch as you pull rather than trying to lift off the ground.

When your elbows are down, notice:
- Where are your shoulders? Is there space at your neck?
- What is your back doing? Is it round, or is your chest open?
- Are your arms at your sides or are they a little bit in front of you?
Ideally, we want shoulders down, back flat, and arms by the sides.
Now, try lifting your feet off the ground and see if you can keep all your parts in the same place.


You can do the same thing with your hands together, like they’d be if you were doing a straddle up! It’s harder to keep your chest open and your upper back flat with your hands together, which probably means it’s something to work on…
Now that we’ve found our starting position, we can start moving into our inversions!
Theoretically, if we’re starting from a strong lock off position, the thing that’s moving us as we tip upside down is our elbows straightening. I know, easier said than done.
But from a purely mechanical stand-point, this is all that’s happening:

The muscles that straighten the elbow are the triceps. They’re on the back of your arm, and connect from your shoulder down to below the elbow. They are going to work best doing this skill if the upper arm is not moving. Remember, your lats are supposed to be doing that job! And if you’re a snuggler, your triceps aren’t going to be as effective either.
Use your triceps!
I like to do this exercise laying down because it gives your feedback about what your head and shoulders are doing, and the body position is more like when you’re inverting. If this set up doesn’t work for you, you can do essentially the same thing standing up.
Tricep Press
- Anchor a resistance band a few feet from the floor. I’d use a medium-ish resistance, but also use whatever you have.
- Lay on your back with your head towards and in line with the anchor.
- Grab the band in either hand and bring your elbows to your sides. Your feet can be on the ground, or you can tuck your knees up in front of you.
Think about your lock off position here: elbows are reaching towards the waist, there is space at your neck, and your chest is open.
Press your hands towards your hips to straighten your elbows, keeping your upper arm still. As you bend your elbows, slow it down so the band isn’t doing all the work. Notice if your shoulders want to lift at any point, or snuggle forward. If it’s happening when you’re doing this on the ground, it’s definitely happening when you’re in the air!

Now let’s move!
This is a conditioning exercise that you may already be familiar with, but let’s add some details and see if it helps you assess what you’re struggling with.
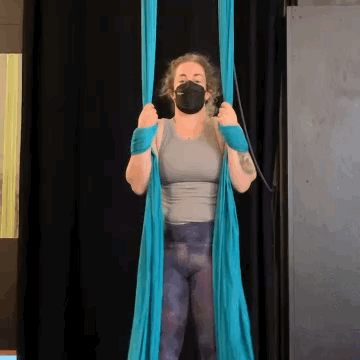
Tuck Rocks in the Knot
- Tie a knot in a fabric, or use a lowish sling.
- Straddle back and bring your feet together behind the fabric.
- Reach your hands up to hold the fabric above your thighs.
Now, before you start moving, think about setting your upper body. When I say that I mean lift your chest and flatten your upper back, reach your elbows towards your waist, and make sure there is space at your neck and your chin is slightly tucked.

When you’re ready to move, try to lift yourself out of the sling by bringing your shoulders to your hands. Then, push yourself back upside down. The goal here is to maintain all your parts while you do this, your chin stays tucked, your shoulders stay down, and your elbows are by your waist.

You also want to pay attention to what your lower body is doing (and we’re going to talk more about connecting it all in the next post, don’t worry!)
When you’re lifting yourself up, try to keep your knees pulling towards your armpits. When you push yourself upside down, keep that knee to armpit pull – try not to let your butt drop.
Things to watch out for:
- When you lifted yourself up, did you snuggle? Are your arms in front of you or by your sides?
- When you push yourself back, did your elbows wing out to the sides?
- What about your head? Did you throw it back or keep your chin tucked?
- Did your back arch? Did you leave your butt behind?

If you find yourself struggling with any of these things, I suggest reducing your range of motion and only lifting as high as you can keep everything organized. Halfway, ¾, until you can do the whole movement with all the details.

And you also have some new ground conditioning to help support this new movement!
Was this helpful? Then stay tuned for my next blog where I’ll discuss how to KEEP your butt over your head once you get it there.
If you don’t want to miss it (and I promise, you don’t want to miss it!) then sign up for my mailing list to be notified when it’s live!

Just came across these inversion posts, and they have been really awesome in helping me break down how to invert with my hoop students. One thing I noticed is that you talk about needing the triceps as you lean back (head down, butt up). My understanding is that it would be an eccentric biceps contraction, since the resistive force is gravity…if you were doing the opposite of an invert (come back up from an invert) you would be contracting biceps to bend your arms, so that means you are doing an eccentric biceps contraction going back down into gravity, no? And thus working on your bicep strength would make more sense here? (Please correct me if I’m wrong!)
Hey Gail, what a great comment! What you’re describing is how an open chain exercise works. Like a biceps curl, as you bend the elbow, biceps shorten, as it straightens, biceps lengthen.
So, the big thing that makes this different from what you’re talking about is that when you’re inverting, you’re doing a closed chain exercise because our hands are the fixed point that we’re moving around. In closed chain movement, we get co-contraction, which means that all of the muscles around the joints in question have to work. So while it’s true that biceps are eccentrically lengthening, the triceps really have to work to straighten the elbow. The other thing to consider is how we are changing our relationship to gravity with this movement. If you were upside down doing that same biceps curl, all the sudden it would be a triceps exercise!
Neat, I will have to study open vs closed chain so I understand it better. 🤓
“So while it’s true that biceps are eccentrically lengthening, the triceps really have to work to straighten the elbow.”
Maybe you can help with me thinking this part actually…I feel like if I’m tipping back, the challenge would be to stop myself from straightening my arms too much too fast. So in trying to make sense of the quoted part, I am thinking perhaps that the tricep push away from the fixed point your hands are at is needed to get that tip started? Which would make triceps important for the first bit, but biceps are more important to control the latter bit? (This is actually a bit easier to reason about in the pole context since it’s an even more solid fixed point than hoop…it’s easier to think about pushing away from the pole at first to get tipping backwards.)
What you’re describing to me sounds like more of an issue with lack of support from your lats. In the context of a bent arm inversion, the lats should be holding the upper arm still, so that the triceps can effectively extend the elbow.
If you or your students are struggling with letting the arm straighten too soon, it’s almost certainly because the upper arm is getting pulled away from the body, not because your elbow is straightening to quickly.
It might also help to think about this in a slightly different way: instead of thinking about head going down, what if you think about hips going up? If we’re actively lifting our hips to our hands, we’re not going to have any issues with going too fast.
In a closed chain contraction, all the muscles should be working equally, so there’s no point when one becomes more important than the other. They all have to work together in order for the movement to actually happen.
Hope that helps!
Oops, never posted a response! Just wanted to say thanks, and yes, your explanations helped. Appreciate the time you took to write these up. 🙂
Thanks for asking great questions, glad I could help!
I came for the information (which is so helpful) but this conversation in the comments was the extra delight! From a baby aerialist POV, this is the equivalent of sneaking into a college lecture as a 7th-grader (we all wanted to do that, right?) What probably seems like a small exchange of information to you two is a cascade of new & interesting things to research for me!
Good questions always lead to a great conversation, and I’m happy you found it helpful!