Aerial is a complicated business. There’s a whole lot of different stuff happening in your body even when you’re doing basic skills, and it can be hard to know what’s going wrong when you’re trying to do something hard and also pay attention to 1 million different things all at the same time!
Inverting is one of these “basic” skills that can elude and confound you for ages. While this may be a foundational skill, it’s still really really hard! Especially for those of us who have zero previous experience with this sort of movement, struggle with upper body strength, or who have larger bodies. You might also struggle to get this skill back if you’ve been grounded because of injury or after having a baby.
If you are a student who is struggling to invert, or a coach who isn’t always sure of how to help your struggling students, this blog series is for you!
Over the next few weeks, I’ll be talking about:
- What happens when you invert
- What often goes wrong, including mistakes you probably don’t know you’re making + how to fix it
- My favorite drills and exercises I use to help people learn to invert, or refine a struggling inversion.
Note: In these posts, I’m going to be talking about bent arm inversions. If you need help with straight arm inverting, go peep at Jessica John/Circus Mobility. She’s rad.
Let’s start at the beginning: what is inverting?
When I talk about inverting, I’m talking about the act of flipping yourself upside down while hanging from your hands. You can do this with your hands separated, either on separate fabric poles or hanging on a trapeze or lyra, and keep your legs together while you invert into a tuck or pike shape. You can also do this with your hands stacked on top of each other on a rope, or together on a bar, and take your legs around your arms to find an inverted straddle or straddle up.
While some details of these inversions may be different, the big picture is the same: make yourself as small and round as possible, tip yourself upside down, and figure out how to stay there.
It’s that easy!
Lol, j/k! If it was that easy, I wouldn’t be writing this! While this concept is simple, figuring out how to execute it consistently can take some time! So, let’s break it down and look at the pieces so you can assess what part you’re struggling with and work on it.
Today, we’re going to talk about Small and Round.
We get small and round to invert because it brings our mass closer to our center of gravity. This can make it easier to find the leverage you need to flip yourself over.
There are two key components to small and round:
Active hip flexion
In inversions, active hip flexion is how far you can pull your leg in without assistance with your knees bent.

Lumbar Flexion
The lumbar spine is your low back, the space between the base of your ribs and the top of your pelvis. This part of your spine flexes (gets round) and extends (arches).
It’s really easy for this part of your spine to get stiff and stuck, especially if you have tight hips or if you spend a lot of time sitting. When it gets stiff, it can be really hard to flex it! And when we can’t flex our low back, we may compensate by extra rounding in our upper backs which is going to affect how we use our shoulders and arms.


Now that we know more about small and round, let’s talk about how we can get smaller and rounder!
Let’s start with the hips!
If hip flexion is where you’re struggling, here’s a couple of things for you to try.
Lay on your back. Tuck your knees into your chest. Curl up and squeeze one elbow to your knee and push your knee into your elbow. If you can’t reach with your elbow, use your hand! With your other arm and leg, reach your leg away and your arm by your ear. Bend the arm and leg in to tap knee to elbow and reach away again! Do this 10 or so times and then switch sides. The key is to keep pushing your knee and elbow together on the side that isn’t moving.

I also love this exercises, all you need is a wall!
Okay, moving on!
If you recently (like, 5 minutes ago) discovered that your low back doesn’t want to flex, DON’T WORRY! You are not alone! My low back HATES to move!
Let’s start with isolating the movement so you can feel what it feels like to only move your lumbar spine.
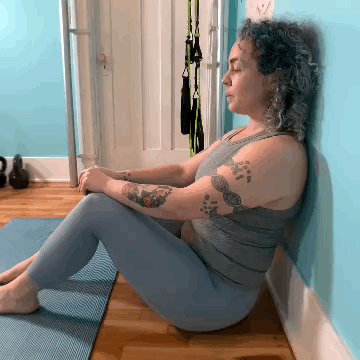
Sit 4-6” in front of a wall. Lean back so your shoulders and head are on the wall, but sit up tall on your sitz bones. You should have some natural curvature of your spine. Now, roll off your sitz bones like you’re trying to pull your back to the wall. If you had a tail, you’d be curling it between your legs like you’re a bad dog. Notice if your head and shoulders are trying to come away from the wall while you do this and tell them no! Then rock back to your neutral position. I think about trying to pull my belly button under my ribs when I do this. Practice this rocking motion until it feels comfortable, it should feel easier each time you do it.
Here’s another of my favorite exercises for finding flexion – go grab a bath towel and try it!
Now, let’s put everything together!
If you’re on hard floors, you might want to grab some extra padding for this! Throw a blanket or towel over your mat if you need it.
Sit with your knees tightly tucked into your chest. Reach your hands towards your ankles and let your feet float off the ground. Round your low back like you’ve been practicing, and look towards your belly button. Hold this shape and roll back on to your shoulders (NOT onto your neck and head!), and roll back up to balance in your sitting position.
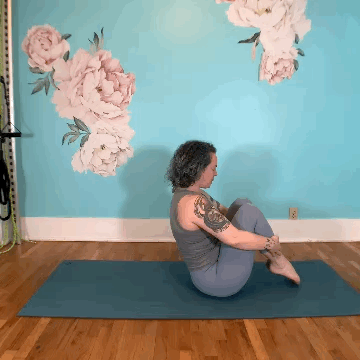
Here’s the details: don’t kick with your legs, keep your heels pulling to your butt the whole time. Try to hold your legs as lightly as possible while still keeping them close to your body. If you feel a THUNK, that means you’re losing your low back. Think about that feeling of pulling your belly button under your ribs and try to maintain it, especially when you’re rolling back up.
If it’s hard, that just means you’re doing it right! And probably that you should work on it more…
Got a question about any of this? I’ll answer it!
Next time, I’m talking about what’s happening in the upper body and how to tip yourself upside down! Make sure you get it right away and sign up for my mailing list!

This makes total sense – thank you for your time and patience to do this! Look forward to more!
I’m so glad it helped!!
Pingback: Lauren Kehl Aerial Fitness - Versatile Arts in Seattle, WA
Pingback: Lauren Kehl Aerial Fitness - Versatile Arts in Seattle, WA